Quantcast
Channel: Syed Jahanzaib –سید جہانزیب – Personal Blog to Share Knowledge !
Viewing all 410 articles
Browse latest View live

Troubleshooting IBM ULT3580-TD3 Tape Drive in Windows 2003 > Short Notes

$
0
0

tape

Recently we had a severe power failure and our UPS didn’t provided backup and got shutdown immediately. Upon restoring every thing back to normal, One of Tape Drive (IBM ULT3580-TD3 SCSI Drive) connected with our File Server didn’t respond properly and failed to backup on tape, Also it didn’t appeared in ntbackup Media List.

I tried every possible way to troubleshoot it but no use. I tried removing / Enabling Disabling Tape Drive/Scsi Card, but didn’t worked out. Tape Drive and SCSI card were detecting properly in Device Manager but in RSM (Removable Storage Manager)  , it showed RED cross on Tape Drive with  multiple instance of Tape Drive. When I took properties of the drive, it showed following error.

the object identifier does not represent a valid object

Some images . . .

device manager.

tape-error-in-rsm.

I did the following to resolve the issue.

Power Cycle the Tape hardware and the server in the Procedure :
> Try to restart RSM Service in Services console. if it doesn’t work , then move on below . . .
> Shutdown the Server and then Power off Tape drive,
> Power on the Tape drive and once the Drive is Ready , then Power ON the server

If it still doesn’t help, Try this method . . .

1) First delete all instances of IBM ULT3580 from RSM which are marked as red cross. as showed in the above picture.

2) Update Adaptec SCSI card 29329ALP – Ultra320 SCSI card firmware to latest one from Adaptec web site, Search in Google.)
http://www.adaptec.com/en-us/speed/scsi/windows/u320_scsi_v7006_win32_cert_exe.htm

3) Update IBM Tape ULT3580-TD3 driver from
http://delivery04.dhe.ibm.com/sar/CMA/STA/02mq3/9/IBMTape.x86_6217.zip
Extract it to any folder and execute install_exclusive.exe , after it updates it will ask you to reboot, simply Reboot.

After reboot complete , Open the command prompt and issue following command.

rsm view /tlibrary

Result should be something below

C:\>rsm view /tlibrary

LIBRARY

Off-line Media
Kingston DT 101 G2 USB Device
HP DVD Writer 1260r
IBM ULT3580-TD3 SCSI Sequential Device

The command completed successfully.

Now issue following command

rsm.exe refresh /lf”IBM ULT3580-TD3 SCSI Sequential Device”

Now again execute RSM and see if it shows OK,
As showed in the image below . .  .

rsm-ok

Execute NTBACKUP and hopefully it will work out this time.
:)

.

Also read following , maybe helpful for any specific case.
http://thetazblog.taznetworks.com/2006/01/sbs-backup-error-code-0x800710d8.html

Regard’s
SYED JAHANZAIB


Filed under: IBM Related

Lotus Notes 8.5 hangs at Splash Screen after Entering Password

$
0
0

Today morning I found a bug in Lotus Notes Client (8.5.2) that after entering password, it hangs on Splash screen on Loading . . . .Please wait and it loops forever
As showed in the image below . . .

lotus.

I did the following to resolve it.

First try this quick fix.

Open Task Manager and end all the notes related tasks, e.g

notes2.exe
nlnotes.exe
rcplauncher.exe

Now try to launch Notes Client again, if it showed the same issue of hanging, then proceed with the following FIX.

*-*-*-*-*-*-*-*-*-*-*-*-*-*-*-*-*-*-*-*-*-*-*-*-*-*-*-*-*-*-*-*-*-*-*-*-*-*-*-*-*-*-

Open Task Manager and end all the notes related tasks, e.g

notes2.exe
nlnotes.exe
rcplauncher.exe

Now Delete all the contents in the folder \Program Files\IBM\Lotus\Notes\Data\workspace
(For Win7 64 Bit)
C:\Program Files (x86)\IBM\Lotus\Notes\Data\workspace

(For Win7 32 Bit)
C:\Program Files\IBM\Lotus\Notes\Data\workspace

As showed in the image below . . .

delete.

Now restart Lotus Notes client. Hopefully it will start without any issue this time :)

Regard’s
Syed Jahanzaib


Filed under: IBM Related

Start windows service under different user credentials

$
0
0

To start windows service under another user credentials , Use following

In Windows 2003:

IF the user belongs to local system

sc.exe config SERVICENAME obj= .\USERNAME password= 123456
net start “SERVICENAME”

OR

IF the user belongs to Domain

sc.exe config SERVICENAME obj= DOMAIN_NAME\syed.jahanzaib password= 123456
net start “SERVICENAME”

TIP: Make sure you add SPACE after each equal sign in command .

For example: obj= SERVICENAME

It was required for me to start SAP services, after configuring user account with password in services console, they remove password after every restart of system, therefore I made this batch file to execute on startup so they start automatically upon reboot.

Regard’s
Syed Jahanzaib


Filed under: Microsoft Related

IBM Lotus Domino Migration Made Easy

$
0
0

lotus

Recently, in our company, we had a power failure dueto UPS malfunction. After restoring everything back to normal, our email system IBM Lotus Domino 8.5.2 (FP2) services failed to start. We also had Symantec for Lotus Domino installed. Its kernel also got panic, and failed to fire up. Few mail boxes were also corrupted and there inbox view disappeared.
Note that we have very big email boxes for many users like 15,20 30GB and mailtracking account crying at 40+GB. After many hours of stress and painful struggling , removing Symantec for mail security, its port configuration in ports section, I was finally able to start the Domino Server and emails start flowing .

When everything got back to normal (except for the Symantec mail security) and many hours downtime dueto R&D, I finally thought to create a DR server for DOMINO so all data should be moved to this DR server, and replace the Production server hardware with newer model of IBM Xseries M4 server.

Following is a complete method on how I migrated my Lotus Domino server to new machine.

SCENARIO:

IBM LOTUS DOMINO PRODUCTION SERVER

OS / APPLICATION
Windows 2008 R2 SP1 installed in OS C: drive
IBM Lotus Domino 8.5.2 FP2 installed in D:\LOTUS
Symantec For Lotus Domino 8.0.9.151 installed at setup default location

HARDWARE
IBM Xseries M2
RAID1 for OS
RAID5 for Lotus Domino Installation & DATA

For migration I followed following steps.

1) Install Windows 2008 R2 SP1 on new machine in C: Drive
2) Run Windows Update
3) Install IBM Lotus Domino 8.5.2 in D:\LOTUS
DO NOT RUN SERVER CONFIGURATION WIZARD . . .
4) Install Domino FP2
5) Install Symantec For Lotus Domino 8.0.9.151 at setup default location
6) Copy notes.ini from Production Domino Server D:\LOTUS\DOMINO\ to this machine at D:\LOTUS\DOMINO
7) STOP DOMINO SERVER AT PRODUCTION SERVER by using quit command in console.
(You can copy data from live server to this DR but chances are high that few mail boxes will require consistency check and possibly few attachments or user inbox view can be corrupted and need to re rebuild by refresh design and fixup. In my case I had the DATA folder in my file server, so I copied it from there.

8) Copy complete DATA folder from Production Domino Server (or File Server if you have backup it to file server) to this machine at D:\LOTUS\DOMINO  (Overwrite all files).
Please note that DATA folder can be big in size and can take long time for copying as it also contains mail and possibly archive folder which contains users mail files. In my case, DATA folder size was around 400GB and it took around 5-6 hours to copy the whole data.
The DR server was low specs IBM Xseries 3650 refurbished server with RAID5 for DATA .
At production server, I was using IBM Xseries M2 with RAID5 for DATA , and Gigabit connectivity, Copy time can vary as per the network and hardware capacity.

9) Unplug the Production server from LAN.
10) Rename the DR server name with the Production server name and same ip address, same as production domino server. and restart

Upon rebooting, Start the Lotus Domino Server console and monitor all the messages appearing on the screen. It may take some time to start the server because it will first initialize all the LOGs file. In my case it took 20-25 minutes to initialize the server at first time. You can delete un necessary logs file like LOG.NSF to speed up the process.

To be continue . . .

Regard’s
Syed Jahanzaib


Filed under: IBM Related

Howto block DHCP traffic via Mirkotik BRIDGE

$
0
0

Howto filter traffic via BRIDGE in Mikrotik RouterOS / RB

network-zaib

Scenario # 1

# Network A is running VPN server with DHCP server having ip pool 172.16.0.0/16 series.

# Network B is running PPPoE server with DHCP server having ip pool 10.0.0.0/xx series.

Now Network A wants to merge with Network B and the Operator A wants to use his own DHCP rather then using Network B DHCP. As we all know that we cannot run two DHCP parallel in same network. Following is an workaround to accomplish the task.Create BRIDGE in mikrotik and block DHCP traffic. See the following rules. These are CLI commands , but you can use the GUI to do the same.

First Add bridge port.

/interface bridge
add admin-mac=00:00:00:00:00:00 ageing-time=5m arp=enabled auto-mac=yes disabled=no forward-delay=15s l2mtu=1522 \
max-message-age=20s mtu=1500 name=ds-bridge priority=0x8000 protocol-mode=none transmit-hold-count=6

Now Add Ethernet ports in bridge, For example we want to use Port No 2 and 3 for bridge.
[ Port 2 is connected with Network A and port 3 is connected with Network B ]

/interface bridge port
add bridge=ds-bridge disabled=no edge=auto external-fdb=auto horizon=none interface=ether2 path-cost=10 point-to-point=\
auto priority=0x80
add bridge=ds-bridge disabled=no edge=auto external-fdb=auto horizon=none interface=ether3 path-cost=10 point-to-point=\
auto priority=0x80

Now enable firewall filtering for this bridge.

/interface bridge settings
set use-ip-firewall=yes use-ip-firewall-for-pppoe=no use-ip-firewall-for-vlan=n

Now your BRIDGE is ready to pass traffic to both networks.

Add firewall filter rules to block DHCP traffic, You can use the same topology to filter any traffic from passing by, For example common virus ports or any specific port you like to block , you can simply add it in filter rules.

/ip firewall filter

add action=drop chain=forward disabled=no dst-port=67 protocol=udp
add action=drop chain=forward disabled=no dst-port=68 protocol=udp

add action=drop chain=input disabled=no dst-port=67 protocol=udp
add action=drop chain=input disabled=no dst-port=68 protocol=udp

add action=drop chain=output disabled=no dst-port=67 protocol=udp
add action=drop chain=output disabled=no dst-port=68 protocol=udp

I dont remember exactly but I guess one or two rules in above are not necessary, i guess OUTPUT rules are not necessary. Just check the packets counting and remove un unnecessary rules.


Regard’s
Syed Jahanzaib


Filed under: Mikrotik Related

Symantec Mail Security for DOMINO / Short Notes

$
0
0

Symantec Mail Security For Domino Short References:


To re install license file in Windows 2008 64 bit, Follow the below.

First stop SAV and npas by

tell sav quit
tell npas quit

Now delete symantec license file from symantec folder which is in .slf extension. License Files Location (you can also search *.slf extension in C:\ drive)

C:\ProgramData\Symantec Shared\Licenses

Now start SAV by

load nntask
tell npas start
or
load npas

Now from domino admin client, goto Files/SAV/Settings/Licensing/ and click on INSTALL OR UPGRADE LICENSE
[Note: Make sure you are connected to internet before performing this action.]
You should see Successful message upon valid license verification. If not, please provide valid license or contact your local vendor to acquire right license for your product.

How to gather Information of SAV via domino console

tell SAV info

Howto Start / Stop SAV & Premium AntiSpam PAS Service task

To quit SAV, issue following command at domino console

tell sav quit
tell npas quit

To start SAV & PAS (Premium Antivirus Service)

load nntask
load npas

Symantec Premium Antispam Service not enabling after Re installation / Upgrade

After you re install SAV or Upgrade, PAS is not enabling, which is essential in order to filter / block SPAM mails from arriving in your user’s Inbox. In SAV settings / ANTISPAM / PREMIUM ANTISPAM , when you double click on your server to enable PAS, it will show no error and just red cross appears. Also no error appears on the console.

First make sure you have valid license installed for SAV. Issue tell SAV info from domino console.
Sample of working sav info is below.

tell sav info

02/23/2013 06:34:18 PM  Remote console command issued by syed jahanzaib/XYZ: tell sav info
Auto-Protect:
EMail Scanning:             on
Write Scanning:             on
Mass-Mailer Cleanup:          on
Security Risk Detection:      on
Premium Antispam Services:    off
Standard Antispam Service:    on
Content Filtering:            off
Multimedia-Executable analysis: on
Outbreak Detection:           on
Virus Definitions:            02/22/2013 rev. 003
Spam Definitions:             07/28/2009
Last Threat Found:            none
Description:                none
Quarantined Documents:        0
Unrestored:                 0
Statistics Since:             02/23/2013 01:55:59 PM
Auto-Protect:
Files Infected:           00
Files Repaired:           0
Files Deleted:            00
Files Unrepaired:         0
Other Scans:
Files Infected:           0
Files Repaired:           0
Files Deleted:            0
Files Unrepaired:         0
Mass-Mailer Cleanup:
Messages Deleted:         0
Security Risks Detected:    0
Spam Mails Detected:        00
Scan Errors Detected:       0
Current product license: FULL LICENSE. Final product license expiration: NONE.
Current content license: FULL LICENSE. Final content license expiration: 06/20/xxxx.
Current premium antispam license: FULL LICENSE. Final premium antispam license expiration: 06/20/xxxx.

As you can see that Current product license , Current content license and current premium antispam license is valid but still PAS is not enabling, Follow the below . . .

# Make sure your SAV and PAS service are set to auto start in notes.ini
Sample of notes.ini section where SAV info is entered, make sure you have nntask and npas in line.

<span style="color: #000000;">ServerTasks=ntask,npas,Replica,Router,Update,AMgr,Adminp,Sched,CalConn,RnRMgr,HTTP,IMAP,POP3</span>

load npas service manually , and then try to enable PAS
load pas npas

Now try to enable PAS, hopefully it will enable in few seconds without any error :) Dont forget to click on refresh after few seconds to get update result.

SYMANTEC MAIL SECURITY FOR DOMINO , LIVE UPDATE NOT WORKING

More to come.


Regard’s
Syed Jahanzaib


Filed under: Uncategorized

Windows 2008 Group Policy ! Fun Things to DO

$
0
0

Howto disable Windows Firewall using Group Policy in Windows 2008

I personally don’t think it’s the best way to disable windows firewall specially in a large network environment, but recently I was in a situation where I needed it to avoice some arguments with few co workers. Here is how you can do it on a Windows 2008 server.

Open Group Policy Management,
Select the policy to edit (Usually: the default policy), right-click and choose Edit.
Go to Administrative Templates > Network > Network connections > Windows Firewall > Domain Profile.
Disable the “Protect All Network connections” rule.  Do the same for the “Standard Profile”, as well.

Now, all that’s left to do is update the clients.  Default Update time for group policy is 6 hours, but you can push it forcefully by using following command:

gpupdate / force

then simply log off and log on the client again.

Disabling Action Center’s Firewall Notification through GPO

As far as I know, there is not a policy that will disable only the Firewall Notification. The closest options we could configure are two policies that are related but neither is really a complete solution and will block other types of notifications as well:

1) Disable all balloon notifications:

User Configuration \ Administrative Templates \ Start Menu and Taskbar \ Turn off all balloon notifications

2) Disable Action Center itself:

User Configuration\Administrative Templates\Start Menu and Taskbar \ Remove the Action Center icon
(Thanks for the TIP from http://social.technet.microsoft.com/Forums/en-US/winserverGP/thread/e78a30cb-6cf2-4de6-afda-e0c90a3d2e34/ )


Regard’s
Syed Jahanzaib


Filed under: Microsoft Related

HyperV Manager access denied unable to establish communication

$
0
0

Today I was trying to connect to one of HYPERV virtual server hosted on Microsoft Windows 2008 CORE edition using HyperV manager, I received following error.


hyper-v error

I have connected to this server several times with my workstation, but i guess after upgrading windows, it failed to connect.

To solve it, I did following and it worked perfectly ;)

Goto start / run and type

dcomcnfg

Open the Component Services node, then the Computers node, then right click on My Computer and click on Properties.
- Click on the COM Security tab.
- Click the Edit Limits button under Access Permissions.
- Enable Remote Access for Anonymous Logon
- Click Apply and OK.

As showed in the image below . . .

dcomcnfg.

dcomcnfg-2.

dcomcnfg-3

Close the Component Services console , Now Try to Start the Hyper-V Manager and connect to your HyperV server.
Hopefuly it will connect this time.

Regard’s

SYED JAHANZAIB


Filed under: Microsoft Hyper Visor Related

Howto create password less Domino Server ID

$
0
0

Recently I installed Lotus Traveler and Domino Cluster to my existing DOMINO infrastructure. When registering server ID , it asked for password, and when I added this server ID file to the target server and try to start domino, it always stop asking for password at startup. So after every restart it stops asking for password and dont start automatically the server until i enter the password. So if you would like to set up the Lotus Domino / Traveler / Sametime server to launch without prompting for the password then the simple solution is to re-certify the server ID with the original rectifier ID that was used to certify the server ID, and then set the minimum password length to zero.

Open Domino Admin client,
Goto Configuration Tab,
select Configuration > Certification > ID Properties.

Then click the “Change password” button. On the “Change password” window, select the “No password” button and select OK.

Now use this ID file at your target server and it will start without asking for password.

Reference:
http://www-01.ibm.com/support/docview.wss?uid=swg21100824

Regard’s
Syed Jahanzaib


Filed under: IBM Related

Howto disable chat window popup in IBM Lotus SAMETIME 8.x

$
0
0

After a default installation of the IBM Lotus Sametime Connect client, it is set to bring chat windows to the front.  This behavior can be annoying for any serious working user because whenever any user send message to another, it come to front , overriding other task.

To disable popup , Go into

Preferences >

Notifications >

Click on “One-on-one chat” >

Then change then remove check from “Bring window to dront on new chat” & “Bring window to front on chat response

As showed in the image below . . .

sametime-chat-popup

Simple :)

Regard’s
Syed Jahanzaib


Filed under: IBM Related

NTBACKUP commmon issue and there fixes :)

$
0
0

In our company, we are using TAPE drives to backup our data on various servers. It was running successfully since many years, but from past few weeks, it started to create strange issues and backup were failing with multiple errors in logs , for example

Logs Error # 1

Volume shadow copy creation: Attempt 1.
Timeout before function completed
Error returned while creating the volume shadow copy:0x80042319.
Error returned while creating the volume shadow copy:80042319
Aborting Backup.
----------------------
The operation did not successfully complete.
----------------------

Logs Error # 2

Volume shadow copy creation: Attempt 1.
Timeout before function completed
Error returned while creating the volume shadow copy:0xffffffff.
Error returned while creating the volume shadow copy:ffffffff
Aborting Backup.
----------------------
The operation did not successfully complete.
----------------------

This error occurs when the creation of the Volume Shadow Copy times out.
This is more common during periods of high disk activity, or on disks that are heavily fragmented.
To solve it, Try following solutions

1- Make sure you have Latest Service pack for windows 2003 Server, If dont Update it first,
Now Download HOTFIX from
http://support.microsoft.com/kb/833167/en-us
OR http://hotfixv4.microsoft.com/Windows%20Server%202003/sp1/Fix67560/3790/free/158865_ENU_i386_zip.exe

After applying, restart your server and try NTBACKUP again. If the problem persists, then continue below

2- Set following services startup type to AUTOMATIC , and start them

- Microsoft Software Shadow Copy Provider
- Virtual Shadow Copy
- Volume Shadow Copy (VSS)
- Remote Procedure Call (RPCSS) – should be enabled as “Automatic”
– COM+ Event System (eventsystem)
– System Event Notification Service (sens) – should be enabled as “Automatic”

Adjust above services accordingly and now try NTBACKUP again.

3- Re-Register few dll’s ,Open command prompt and copy paste following lines.

Net stop vss
Net stop swprv
regsvr32 ole32.dll  
regsvr32 oleaut32.dll
regsvr32 vss_ps.dll  
vssvc /Register
regsvr32 /i swprv.dll
regsvr32 /i eventcls.dll
regsvr32 stdprov.dll
regsvr32 es.dll
regsvr32 vssui.dll
regsvr32 msxml.dll
regsvr32 msxml2.dll
regsvr32 msxml3.dll
regsvr32 msxml4.dll

Now Restart your server and try NT.Backup again. Hopefully it will work fine :) , at least in my case, it DID :)

Regard’s
Syed Jahanzaib


Filed under: Microsoft Related

Howto remove your mail server IP from HOTMAIL black list

$
0
0

Recently Hotmail started to reject emails coming from our domain , giving following error.

Error transferring to mx4.HOTMAIL.COM; SMTP Protocol Returned a Permanent Error 550 SC-001 (SNT0-MC2-F23) Unfortunately, messages from xxx.xxx.xxx.xxx weren't sent. 
Please contact your Internet service provider since part of their network is on our block 

I check at mxtoolbox.com website mail server blacklist checker and all over the internet in all possible dns black lists but my IP address was not listed and it was clean. I then signed in to Microsoft Smart Network Data Services at  https://postmaster.live.com/snds/ and found out that my IP address was in Hotmail black list.

blocked-1

I found out that Microsoft has an Eform for De-Listing / removing spam black listed mail server IPs not able to deliver to Hotmail and live.com.

Fill out the below form

https://support.msn.com/eform.aspx?productKey=edfsmsbl2&ct=eformts

It will ask you Contact name, Contact e-mail address, Enter your Email Server Public IP in  Outbound IP(s) or range(s) and submit, You will receive an ticket number and it may take upto 2-4 days for your request to be entertained. Hopefully they will remove it from there black list. It also happens if you sent email to any user and he mark it as junk/unwanted then it auto adds in Hotmail monitoring system.

TIP: Using Internet Explorer I receive an error has occurred while submitting the above form, After using Firefox I was able to successfully submit the form.

More info can be found here.

http://pc-freak.net/blog/howto-remove-delist-your-mail-server-ip-from-hotmail-live-com-and-msn-mail-server-blacklist/


Regard’s
Syed Jahanzaib


Filed under: Microsoft Related

Lotus Domino Cluster / High Availability

$
0
0

Recently we added secondary server (clustered) for our email system using Lotus Domino. Clustering is an excellent topology which really works in lotus environment, and is also used for high availability. Following is an small howto reference guide I created for future reference. Using this guide you can also create cluster server for your domino server. It really helped me in many situation when database corruption occurred at production server or I have to plan any upgrade and downtime is required. Client switch over to cluster is almost seamless and most of the time, client even don’t notice it that he is on cluster server :)

======================================================================
Some Best Practices:
( Excerpt from Making Domino Clusters a Key Part of Your Enterprise Disaster Recovery Architecture BY Andy Pedisich )

Technotics

A few guidelines regarding configuring clusters, especially for clusters used for disaster recovery
* Servers in a cluster should not use the same power source
* They should not use the same disk storage array
* They should not be in the same building, Never in the same room
* Have plenty of CPU power and memory. „It’s safe to say that clustered servers need more power and more disk resources than unclustered servers

======================================================================

I assume that you already have working domino server in place. first thing first, create server ID that will be use when secondary domino server installation is initiated at cluster server.

Current Scenario:

Primary Mail Server: D1
Secondary Mail Server: D2
Domain Name: syed

Create Server ID for Secondary Server

-  Open Domino Administrator Client,
-  Goto Configuration ,
-  On right side panel, click on Registration > Server ,
-  In Server Name, type your Secondary Server name,
-  In Domain name, type your domain name
-  In Location for storing server ID, click on in file, and select your destination folder. (Save it any folder that you can access later from secondary server to copy this ID file)
-  Click on Green Icon of tick, and then click on REGISTER

cl-1
Now goto your cluster server,

CLUSTER SERVER SETUP:

At your Secondary Server, Initiate Domino Server Setup, Click NEXT to Continue . . .

d2-1

Click on Setup an additional serverd2-2

Click on Browse and select the D2 server id that we created earlier at production server. (You can copy the id file from the production server to this cluster server)d2-3

d2-4

d2-5 d2-6

.

Type in your Production server name , so this secondary server will know from where to pull its replication data.d2-7

d2-8

d2-9

d2-10

After clicking on Setup it will start configuring its initial setup.

After it finishes, double click on the DOMINO SERVER icon on your desktop to launch the server.

After initiating, it will start replicating names.nsf

Now its time to add this secondary server into cluster group at production server configuration.

Add Secondary Server into Cluster Group at Primary Server

- Open Domino Administrator Client,
- Goto Configuration ,
- Goto All Server Document, Here you will see both server names, Primary and Secondary
- Select both servers and click on Add to cluster

As showed in the images below . . .

d1-1
A popup will ask you if you want to continue, Click on YES
It will ask you for cluster name with option of “Create new cluster“, click OK to continue

As showed in the images below . . .

d1-2
Now enter your cluster name and click on OK OK
It will ask you if you want to create it immediately, click YES

As showed in the images below . . .

d1-3

Wait few minutes so that it creates cluster.
Now at your Primary Server domino Console. Issue following command to start replication of Primary Domino Databases to Secondary Server. (not mail boxes)

replicate D2

As showed in the image below . . .

d1-4

After its replication finishes, its time to create replicas of your mail files to secondary server. For this purpose you have to first assign necessary permissions at secondary server.

Assigning Permissions for Create Replica

- At your Primary server,
-  Open Domino Administrator Client,
-  Goto Configuration ,
-  Goto All Server Document, Here you will see both server names, Primary and Secondary
-  Double click on Secondary Server.

As showed in the image below . . .

d1-5
Goto Security,
In Server Access – Who Can section, Add your Admin ID and Primary Server name in following Sections.
  – Create database & templates
  – Create new replicas

As showed in the image below . . .

d1-6

Click on Save & Close

Create Replicas of Users Mail Files

To create mail replica copies of user mail files from primary to secondary, First you have to create mail folder in secondary server, because when domino first install, it donot create mail folder.

- At your Primary server,
- Open Domino Administrator Client,
- Goto File / Open Server , Select your secondary server, if its not appearing in the list, then click on Other and it will show you both servers, click on secondary server. You can also type in your secondary server name with its domain, for example D2/syed .Now you will be connected to your secondary server.
- Goto Files , Right click on Mail Parent folder of Domino, and create New Folder name mail (In my case I installed domino at D:\Lotus\domino\data

After the folder is created, Switch back to your primary server.
- Goto Files section,
- Select your desired mail file, (For test select single mail file, later you can select all or multiple mail files at a time to replicate), On right side panel, Click on Databases > Create Replica(s)

As showed in the image below . . .

d1-7

A new window will popup with some options, First click on Show me only cluster members” so that your cluster servers should appear in the list. Now select secondary server, and click on ADD,
Then select all three options of
- Copy Access Control List
- Create full text indexing for searching
- Exchange unread marks on replication.

As showed in the image below . . .

d1-8
Now click Ok to continue.

Depends on the mail file size , It will few minutes or longer to complete the task. After it creates replica, the user mail file will appear on secondary server under mail folder.
-

. . .  TESTING  . . .

Configure your Lotus Notes Client and send an test message to any user or yourself.
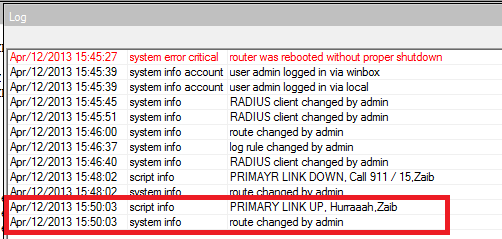
You will see in logs that it immediately replicate/duplicate mail from your primary server to secondary server.

As showed in the image below . . .

d1-11

You can also verify it by directly open user mail file from secondary server using admin client :D :)

MORE TO COME . . .

Regard's
SYED JAHANZAIB

Filed under: IBM Related

Windows Server 2008 R2 Active Directory Reference Guide.

$
0
0

Howto enable RECYCLE BIN in Widnows 2008 Active Directory Server.

Pre requisite to enable Recycle Bin in Windows 2008 Active Directory.

1- Domain controller must be Windows 2008 R2 or later.
2- Forest and domain functional levels must be Windows Server 2008 R2, If not , then first raise functional level to windows 2008 R2 using ADUC
3- Enable Recycle Bin using Power Shell. Follow the below to do so
> Open powershell by using CMD and type powershell
> Load AD module by using following command.

Import-Module ActiveDirectory

Now activate Recycle BIN using following command

Enable-ADOptionalFeature -Identity ‘CN=Recycle Bin Feature,CN=Optional Features,CN=Directory Service,CN=Windows NT,CN=Services,CN=Configuration,DC=zaib,DC=com’ -Scope ForestOrConfigurationSet -Target ‘zaib.com’

Note: Change the zaib , com and zaib.com to match your local domain name

Delete any single user from AD for test purpose

> Now delete any user for test purpose via AD or net command

> From Powershell , Search for deleted items using following commands (TIP: To execute commands related to AD, always load module ActiveDirectory after you launch PowerShell)

Get-ADObject -Filter {name -like “*test*” -and deleted -eq $true} -IncludeDeletedObjects

Note: Change the *test to match the name or portion of delete user name

Restore Deleted User

To restore the deleted account, use following command

Get-ADObject -Filter {name -like “*test*” -and deleted -eq $true} -IncludeDeletedObjects | Restore-ADObject

If you want to use GUI for easy access, then you can try ADRecycleBin.exe (Active Directory Recycle Bin) which allows administrators to quickly restore deleted Active Directory objects via an easy to use GUI (Graphical User Interface). This is a free Active Directory Recycle Bin tool. You can download it from

http://www.overall.ca/index.php?option=com_content&view=article&id=40:adrecyclebin&catid=15:adrecyclebinexe&Itemid=66


Backup and restore system state in windows 2008

Following is an small howto of ‘Backup and restore system state in windows 2008

BACKUP

1- First install the backup features from the Server Manager.
2- Open command prompt and type

wbadmin start systemstatebackup -backuptarget:d:

and press enter. It will ask for confirmation, Type Y to continue

Note: You can use a different backup target of your choosing, it must be a local drive of your server.

When the backup finishes running, you should get a message that the backup completed successfully. Goto your backup drive and you will find folder name WindowsImageBackup with backup data.

RESTORE (Authoritative)

- To restore backup, Boot Windows 2008 in Directory Services Restore Mode (DSRM)

- Open command prompt , First you need to get backup version number so that you may restore correct version of backup, use the followign command to get the version number

wbadmin get versions

- Write down the version you need to use.

- To restore AD in AUTHORITATIVE mode (Usually used for DC), use the following command

wbadmin start systemstaterecovery -version:04/04/2013-15:00 –authsysvol

Note: Change the -version: to match your backup number that noted from wbadmin get version command

- To restore AD in non-authoritative mode, remove the –authsysvol syntax at the end of the command (Usually used at ADC)

To get mroe info, please visit http://www.trainsignal.com/blog/backup-and-restore-active-directory-on-windows-server-2008 for more detailed step by step guide with snapshots

Regard’s
Syed Jahanzaib


Filed under: Microsoft Related

Lotus Domino ICM (Internet Cluster Manager for HTTP failover/load balancing)

$
0
0

Recently we configured Lotus Domino clustere in our company.Everything worked fine, Failover to secondary and move back to primary server when available working good, but the HTTP does not works this way. Browsers themselves are not cluster aware, they ask for specific host-names. For example if one of my primary server goes down, then the web mail users wont be able to access there mail from the primary server mail address.

For this purpose I googled a  little bit and found out that Domino ICM (Internet cluster manager) can fulfill our requirement. This makes our web mail servers highly available to clients. You can run the ICM on a Lotus Domino server configured in clusters (not necessarily clustered). The ICM supports the HTTP protocols acting as an High Availability Bridge between HTTP clients and the Domino Web servers in a cluster. ICM also maintain information about the availability of servers and databases in the cluster.  ICM Sends periodic probes to the Web servers in the cluster to determine their availability.

ICM installation and configuration was a piece of cake, in fact there was nothing to configure much :) You should include the ICM configuration information on every Web server in the cluster, not just the server on which you run the ICM.
This is done because each Web server uses its own Server document to determine how to generate URLs that refer to the ICM
Following is a small howto for my future reference.

I assume you already have Primary and secondary server (clustered) configured. Following is example of network

D1 = primary domino server
D2 = secondary domino server
D3 = domino server for ICM for HTTP

From your primary server ,

1- Register a new server ID with the name of D3
2- Install Domino on 3rd server , run its setup, and configure it as Addition server and provide it D3.id that you created in step 1.
3- Add D3 in existing cluster
3- Goto D3 console, and quit http server (use command tell http quit), otherwise it will gonna conflict with the ICM service which also uses the same tcp 80 port. OR you can change ports as per your requirement IF you want to run ICM and HTTP on same server.
4- Load ICM by issuing following command at D3 console.

load icm

Now from your client end, browse to http://D3 and you will be redirected to the first available server i.e http://D1
For test purpose, quit D1 server, wait few seconds,

Now browse again to http://D3 and this time you will be redirected to http://D2 instead of D1 because ICM maintain the list of available server in the list and will redirect request to first available server.

When an HTTP client is connected to a server that fails, the client receives a typical browser message stating that the server is not responding. To fail over to a different replica, the user must contact the ICM again by entering the D3 address in URL again.

Some information provided in this article have been taken from multiple external resources. For example
Understanding IBM Lotus Domino server clustering By Reetu Sharma /Ranjit Rai

Regard’s
Syed Jahanzaib


Filed under: IBM Related

Mikrotik Multi WAN Fail Over Scenarios

$
0
0

I received many requests from various friends/personnel’s to write something easy about howto create fail over for PCC/Dual Wan . In this guide, I will post some WAN link fail over scenarios. For example If you have two DSL wan links, and one of link goes down , What will happen? If your  DSL modem is down – then check-gateway=ping can save your packets from being sent to that link , But what if your modem is up, and telephone line is down? Or one of your ISP has a problem from there end  ????

There are several method that you can use to sort this problem, either by using NetWatch tool to monitor WAN link , or you can use use scripts to periodically ping remote hosts. And then disable/enable routes.

Following is a very simple method you can use for fail over.

SCENARIO #1
FAIL OVER
for Dual WAN links without Load Balancing & without Scripting

mikrotik-isp-redundancy

We have two WAN links and we want to use second WAN for fail over ONLY, No load balancing is required.

To achieve fail-over follow the  below

Example:

LAN = 192.168.0.1
WAN1 GW= 192.168.1.1
WAN2 GW= 192.168.2.1

External Host ip that we want to monitor for the WAN status. (You can use your ISP’s DNS / Web server ip also or any one which is more reliable and preferably closer to you)

Google DNS = 8.8.8.8
TW DNS (PK) = 221.132.112.8

Following is complete script.

1# Make sure you change the interface names and IP addresses according to your network,
2# In DNS section, Use your ISP’s DNS ip addresses
3# You can use different host ip addresses for monitoring, preferably your primary ISP’s reliable servers like DNS or other. You can use other web sites ips too.

# apr/12/2013 10:41:20 by RouterOS 5.20
# Syed Jahanzaib / aacable@hotmail.com
# Web= http://aacable.wordpress.com
/ip address
add address=192.168.0.1/24 disabled=no interface=LAN network=192.168.0.0
add address=192.168.1.2/24 disabled=no interface=WAN1 network=192.168.1.0
add address=192.168.2.2/24 disabled=no interface=WAN2 network=192.168.2.0

/ip dns
set allow-remote-requests=yes cache-max-ttl=1w cache-size=5000KiB \
max-udp-packet-size=512 servers=208.67.222.222,202.141.224.34
# Or use your ISP's DNS

/ip firewall nat
add action=masquerade chain=srcnat disabled=no out-interface=WAN1
add action=masquerade chain=srcnat disabled=no out-interface=WAN2

#### Following is ROUTE section where we will be using check-gateway function to monitor external hosts from each wan

/ip route
add dst-address=8.8.8.8 gateway=192.168.1.1 scope=10
add dst-address=221.132.112.8 gateway=192.168.2.1 scope=10

add distance=1 gateway=8.8.8.8 check-gateway=ping
add distance=2 gateway=221.132.112.8 check-gateway=ping

The above fail over method works fine,when the WAN1 link will fail , it will automatically fail over to secondary link, and when the wan1 link becomes available all load will shift back to wan1 link. The only negative is that we are using single wan host to monitor, if that particular host (e.g 8.8.8.8) ping goes down and the rest is fine , wan1 link will still shift to secondary link. To avoid it use multiple hosts to monitor wan connectivity.

SCENARIO #2
FAIL OVER
for Dual WAN links without Load Balancing using SCRIPT

mikrotik-isp-redundancy

If you have 2 WAN Links , and you want to use Primary Link for Main internet usage, and in case Primary Link [WAN1] Looses its connectivity with the INTERNET (For example problem with the link between your modem and ISP or Problem between ISP link and the internet), then Secondary Link take its place, and when Primary link [WAN1] restores, it will become active again. You can use the following scripts.

You have to create two scripts for this purpose.

SCRIPT-1 will check Internet connectivity by ping to Google DNS 8.8.8.8 (You can change this value) using Default Primary Link[WAN1], if it fails to receive reply, it will change this route distance value to 3.

SCRIPT-2 will check internet connectivity using Primary Link, if it able to get reply from Google DNS IP 8.8.8.8, it will Primary Link Routedistance value to 1 again, thus primary link will become Active again.

Route Distance values should be

[WAN1]  PRIMARY link with Route DISTANCE value 1
&
[WAN2]  SECONDARY link with Route DISTANCE value 2,

Make sure that you must  do the following

1- Add following comment in the Default Primary Link [WAN1] route

Default Route

(If you don’t add this comment , Script wont be able to locate your default route)

2- Add static route for 8.8.8.8 [google dns] to make sure that monitoring to google dns always goes via primary link)

Ok It’s time to add Scripts

.

.

SCRIPT 1: (For WAN1 Down status checking)

It will check Internet Connectivity (with google DNS 8.8.8.8 , you can change it) Using Default Route (Primary Link[WAN1]), if it fails to get replies from it, it will change the distance value of primary link to 3 , so Secondary Link [WAN2] will automatically be promoted and it will act as the Primary Link for the connectivity.

Note: Following scripts have been taken from following link. I only modify it for my local need.

http://wiki.mikrotik.com/wiki/Improved_Netwatch_II

:local i 0; {:do {:set i ($i + 1)} while (($i < 5) && ([/ping 8.8.8.8 interval=3 count=1]=0))};
:if ($i=5 && [/ip route get [find comment="Default Route"] distance]=1) do={:log info "PRIMAYR LINK DOWN, Call 911 / 15,Zaib";
/ip route set [find comment="Default Route"] distance=3}

.
.

SCRIPT 2:  (For WAN1 UP status checking)

It will again check Internet Connectivity (with Google DNS 8.8.8.8 ) using Default Route (Primary Link[WAN1]) as we have also set fixed route for 8.8.8.8 to always go throught primary link , If it get ping replies from teh google dns using the Primary Link [WAN1], it will change the Primary Link [WAN1] Route Distance back to 1 , so it will become Primary Link again.

:local i 0; {:do {:set i ($i + 1)} while (($i < 5) && ([/ping 8.8.8.8 interval=3 count=1]=1))};
:if ($i=5 && [/ip route get [find comment="Default Route"] distance]=3) do={:log info "PRIMARY LINK UP, Hurraaah,Zaib";
/ip route set [find comment="Default Route"] distance=1}

Make sure that you Add following comment in the Default Primary Link [WAN1] route
Default Route

(If you don’t add this comment , Script wont be able to locate your default route)

default-routeNow You can now schedule them to run SCRIPTs  every 1 minute or whatever is ok for you.

You will see following entries in LOG when WAN link goes DOWN and UP. You can also configure actions to email or SMS you if any link goes down for tack purposes, or if you want to be informed about the WAN status.

As showed in the image below  . .

1- down

2- UP

.

.

.

.

SCENARIO #3

DUAL WAN LOAD BALANCING USING PCC WITH FAIL OVER  without scripting (Very useful :) )

The following script does the two wan load balancing using PCC method, also if any of WAN link will fail , it will automatically fail over to secondary link, and when the particular failed link becomes available load will be start distributing among both links (remember it will not shift back previously made connections like downloads via idm etc. new packets will be distributed) .The only negative is that we are using single wan host to monitor, if that particular host (e.g 8.8.8.8) ping goes down and the rest is fine , wan1 link will still shift to secondary link. To avoid it use multiple hosts to monitor wan connectivity.

1# Make sure you change the interface names and IP addresses according to your network,
2# In DNS section, Use your ISP’s DNS ip addresses
3# You can use different host ip addresses for monitoring, preferably your primary ISP’s reliable servers like DNS or other. You can use other web sites ips too.

# apr/12/2013 11:13:43 by RouterOS 5.20
# Syed Jahanzaib / aacable@hotmail.com
# Web= http://aacable.wordpress.com
/ip address
add address=192.168.0.1/8 disabled=no interface=WAN1 network=192.168.0.0
add address=192.168.1.2/24 disabled=no interface=WAN2 network=192.168.1.0
add address=192.168.2.2/24 disabled=no interface=LAN network=192.168.2.0

/ip dns
set allow-remote-requests=yes cache-max-ttl=1w cache-size=5000KiB max-udp-packet-size=512 servers=208.67.222.222,202.141.224.34
# Use your OWN isp DNS ips , in this example I have used OPENDNS and other isp dns. Filtering is ON at opendns

/ip firewall mangle
add action=accept chain=prerouting disabled=no dst-address=192.168.1.0/24 in-interface=LAN
add action=accept chain=prerouting disabled=no dst-address=192.168.2.0/24 in-interface=LAN
add action=mark-connection chain=input disabled=no in-interface=WAN1 new-connection-mark=WAN1_mark passthrough=yes
add action=mark-connection chain=input disabled=no in-interface=WAN2 new-connection-mark=WAN2_mark passthrough=yes
add action=mark-routing chain=output connection-mark=WAN1_mark disabled=no new-routing-mark=to_ISP1 passthrough=yes
add action=mark-routing chain=output connection-mark=WAN2_mark disabled=no new-routing-mark=to_ISP2 passthrough=yes
add action=mark-connection chain=prerouting disabled=no dst-address-type=!LAN in-interface=LAN new-connection-mark=WAN1_mark passthrough=yes per-connection-classifier=both-addresses-and-ports:2/0
add action=mark-connection chain=prerouting disabled=no dst-address-type=!LAN in-interface=LAN new-connection-mark=WAN2_mark passthrough=yes per-connection-classifier=both-addresses-and-ports:2/1
add action=mark-routing chain=prerouting connection-mark=WAN1_mark disabled=no in-interface=LAN new-routing-mark=to_ISP1 passthrough=yes
add action=mark-routing chain=prerouting connection-mark=WAN2_mark disabled=no in-interface=LAN new-routing-mark=to_ISP2 passthrough=yes

# Default masquerade rule for both WAN links
/ip firewall nat
add action=masquerade chain=srcnat disabled=no out-interface=WAN1
add action=masquerade chain=srcnat disabled=no out-interface=WAN2

###   ROUTE SECTION   ###
### Magic begins here

/ip route

add dst-address=8.8.8.8 gateway=192.168.1.1 scope=10
add dst-address=221.132.112.8 gateway=192.168.2.1 scope=10

## Now we create rules for Isp's routing mark:
add distance=1 gateway=8.8.8.8 routing-mark=to_ISP1 check-gateway=ping
add distance=2 gateway=221.132.112.8 routing-mark=to_ISP2 check-gateway=ping

## Create destinations to "virtual" hops to be use in further routes
add dst-address=10.0.0.1 gateway=8.8.8.8 scope=10 target-scope=10 check-gateway=ping
add dst-address=10.0.0.2 gateway=221.132.112.8 scope=10 target-scope=10 check-gateway=ping

## Add default routes for both isp's marked packets by mangle section
add distance=1 gateway=10.0.0.1 routing-mark=to_ISP1
add distance=2 gateway=10.0.0.2 routing-mark=to_ISP2

## Add default routes for no routing marks , For router itself
add distance=1 gateway=10.0.0.1
add distance=2 gateway=10.0.0.2

For more information, please visit
http://wiki.mikrotik.com/index.php?title=Advanced_Routing_Failover_without_Scripting

Regard’s
Syed Jahanzaib


Filed under: Mikrotik Related

Veeam Backup & Replication Deployment for Virtual Servers/Guests for High Availability + Tips

$
0
0

veeam

At my office, I have multiple ESXi VM Servers with several guests hosted. I am using VEEAM B&R software for backup & replication. I have created Replicas of all my primary servers to DR site on secondary replica server using Veeam. I have hen scheduled replication to run Daily in night. Whenever any disaster occurs either at server hardware level or guest OS level, I simply fail over to replica using Veeam, and when primary server/guest becomes available, I simply Fail Back to Production using Veeam console and all changes replicate back to production from replica. :) Replication can be scheduled to run continously but not recommened, Try to set 6/12/24 hours schedule instead to update replicas.

I will distribute this article in following sections.

1- One time simple backup of VM guest using Veeam
2- Adding daily backup job
3- Restoring VM from backup to production
4- Adding replication job between primary and D.R site
5- Test Failover to REPLICA & FAILBACK to PRIMARY (PRODUCITON)

1- ONE TIME SIMPLE BACKUP OF VM GUEST USING VEEAM

If you want to take simple backup of your guest OS, simply follow this.

After fresh installation of VEEAM, first define its Backup Folder where it will save the images.

Adding Backup Repositories to store images

# Open VEEAM console, Goto Infrastructure
# Right click on Backup Repositories and select Add Backup Repository
# New Window will appear asking for Backup Name, rename it to some meaningful name , for example if you have External USB Harddrive attached, name it External USB Storage and click NEXT.
# Now it will ask storage type, Select Microsoft Windows server and click NEXT
# In Server, Select This Server and click NEXT
# Now it will ask for Folder Location where it will save the veeam images, Simply browse it to the folder where you want to save the images, for example H:\images and click NEXT
# on vPowerNFS window click NEXT
# On Review window, click NEXT to continue select FINISH

ADDING your Virtual Server in VEEAM

# Open VEEAM console, Goto Virtual Machines
# Right Click and select Add Server
# A new window will popup, asking for virtual server type, Select appropriate server, for example VMware vSphere, and select NEXT,
# Now it will ask virtual server IP or DNS name, I always prefer to connect via IP instead of DNS. Enter IP address of your VM server and click NEXT
# Now enter your user id password of virtual server and click NEXT.
# It will show you the summary of server, click FINISH

As showed in the images below . . .

veeam-add-server

select-server-type

veeam-add-ip

veeam-user-passsword

finish

Now that you have created Backup Repository and added your first virtual server into veeam, its time to take our first backup.

Open VEEAM console, Goto Virtual Machines, and select your VM Server, on right window, you will see your virtual guest machines.
Either select one machine or all, right click and select VEEAMZIP
Now Select the storage where you want to place veeam backup image, select and click on OK, it will start backup the guest VM to the backup repository folder.

veeam-backup-1

veeam-backup-2

.

.

2-  ADDING  DAILY  BACKUP  JOB

To do automatic daily backup of your important vm guests , for example daily in night at 1:00 AM, You have to add JOB ,
# Open VEEAM console,
# Goto Virtual Machines , Select your desired guests, right click and select Add to Backup Job / New Job and select NEXT
# Enter any meaningful name for this job, for example Daily Backup in Night @ 1:00 AM and select NEXT
# Select your desire Virtual Machine(s) from the list and select NEXT
# Select your backup repository for example External USB HDD and select NEXT
# On Guest Processing, simply select NEXT
# On schedule window, Click on Run the job automatically, Now select Daily at this time and select your desired time , e.g: 1:00 AM you can also select it run on weekly basis, periodically or whatever is best for your environment and select CREATE.
# Click on FINISH.  (Also click on Run the job when I click Finish if you want to run the job immediately)

As showed in the images below . . .

veeam-daily-backup-job-1

veeam-daily-backup-job-2

veeam-daily-backup-job-3

veeam-daily-backup-job-4

veeam-daily-backup-job-5

veeam-daily-backup-job-6

veeam-daily-backup-job-7

.

.

3-  RESTORING VM from Backup to Production using VEEAM

To restore any VM from VEEAM backup,

# Open VEEAM console, Goto 

To be continued . . .

.

.

4 ADDING REPLICAITON JOB between Primary & DR Site

Replication is another great feature of VEEAM. With replication you can always have an ready to user REPLICA of your selected or all Production Virtual Guests. Replication can be scheduled to run on continuous or scheduled timings. For example I have replication schedule to replicate all the servers on daily at night to secondary DR site. To create Replicas of your production VM guests, You should have

1- Primary VM Server with ESXi or Hyper-V
2- Secondary VM Server with ESXi or Hyper-V (REPLICA SERVER with same ESXI or HYPER-V installation and enough storage space same or above as production server)
3- VEEAM B&R application either Physically installed on any OS like Windows 7 or virtually at DR /PRI Site. I have installed it at DR site.

Let’s start Replicating ;)

# Open VEEAM console, ADD both servers in VEEAM > Virutal Machines section.
# On Primary Server, Right click on your guest machine(s) you want to replicate to REPLICA server and select Add to replication job / New and select NEXT
# Enter any meaningful name for this job, for example Daily Replication in Night @ 1:00 AM and select NEXT
# Select your desire Virtual Machine(s) from the list and select NEXT
# In destination, select your Secondary server (Replica Server) and select NEXT
# In Job Settings window, select your backup repository for example External USB HDD and select NEXT
# On Guest Processing, simply select NEXT
# On schedule window, Click on Run the job automatically, Now select Daily at this time and select your desired time , e.g: 1:00 AM you can also select it run on weekly basis, periodically or whatever is best for your environment and select CREATE.
# Click on FINISH.  (Also click on Run the job when I click Finish if you want to run the job immediately)

As showed in the images below . . .

1

2

3

4

6

7

To view status of replication, Open Veeam console , goto Backup & Replication / Jobs , select Replication. On right window, you will see the job you created in earlier stage. Right click on it and select Statistics and you will see something like below . ..

8

.

5- Test FAILOVER to REPLICA & FAILBACK to PRIMARY (PRODUCITON)

FAILOVER TEST

# Open VEEAM console,
# Goto Backup & Replication
# Goto Replicas, On Right Side window, you will see your REPLICATED VM Guests,
# Right click on your desired guest you want to failover to, and select FAILOVER NOW
# It will again ask for which machines you want to fail over, select your required guest machine(s) and select Next
# In Restore Reason, type reason why you want to failover (for record purpose , if you want to track later why you or other admin used FAILOVER), Click Next and FINISH. Veeam will auto power ON the guest on DR server,

As showed in the images below . . .

1

2

3-a

3

.

For test purpose, Create few folders or files on Replica Guest Server.

As showed in the images below . . .

1.

FAILBACK TO PRODUCTION TEST

Now we will switch back to Production Server (Failback to production).

.

# Open VEEAM console,
# Goto Backup & Replication
# Goto Replicas, On Right Side window, you will see your REPLICATED VM Guests with (ACTIVE) caption and Green Play Icon.
# Right click on your desired guest you want to failback to production, and select FAILBACK TO PRODUCTION NOW
# It will again ask for which machines you want to fail BACK, select your required guest machine(s) and select Next
# In Destination , select Failback to the original VM
# In summary, it will show you the Details of the guest, Select Power on VM after restoring and click Finish

As showed in the images below . . .

1

2

3

4

.

.

After FAILBACK complete, You will see that Guest OS on DR REPLICA server get shutdown and automatically powered ON at Primary Server
As showed in the images below. . .


6


Now open Your GUEST OS at production server, and you will see the changes here that you made at REPLICA server :)

7


To be continued . . .

.

Regard’s
Syed Jahanzaib

//


Filed under: VMware ESXi Related

Lotus Domino not recreating log.nsf automatically after deletion

$
0
0

AFTER DELETION OF LOG.NSF , DOMINO DOES NOT RE-CREATED IT AFTER RESTART

lotus

My Domino server LOG.NSF got grow in size crossing 16GB which is quite a huge size for any log file. Upon examining I found out that there were some flooding of dictionary base mail sending retry from some internet spammer. Anyhow that’s another story that how i coped with it.

For the LOG.NSF, I simply QUIT the domino server, deleted LOG.NSF from the DATA folder and then I restarted Domino Server. By default, Domino recreates LOG.NSF automatically if it does not found log.nsf in DATA directory, but strangely it didn’t. At console it complained that it was unable to found the LOG.NSF file and then exit. I found out that I accidentally deleted LOG.NTF file too which is actually a template that is used to create LOG.NSF So I copied log.ntf from the backup tape to DATA folder and started domino server again, and Alhamdolillah, IT STARTED OK  :)

I then used space-saver option to delete documents older then 7 days.

Also I read somewhere that You can copy log.ntf file and past this copy in the same folder. Now rename this file to log.nsf. Lotus server will work .


Regard’s
SYED JAHANZAIB


Filed under: IBM Related

Howto View MYSQL encrypted password

$
0
0

Encrypted Password Recovery / Syed Jahanzaib

Today morning I forgot my admin account password of DMASOFTLAB Radius Manager. All user id and passwords are stored in MYSQL database name radius . Manager id’s are stored in rm_manager table and all other normal user id’s used for user login are stored in rm_users table.
Passwords cannot be viewed as its stored in encrypted format using SHA1 algorithm.
I used the following method to retrieve the old password (without changing it)

How-to view Radius Manager Admin account password without changing old one !

Login to your Linux box using root account and execute following commands

mysql -h localhost -u root -s -pYOURPASSWORD
use radius;
SELECT * FROM `rm_managers`;

It will show you some scattered information of all the admin accounts with there details and Encrypted passwords.

TIP: You can also use PHPMYADMIN to get info via nice GUI :) , but as I am a creature living in the dark, therefore I like to use black screen to perform my functions ;)

As showed in the image below . .

rm_show_encrypt

As you can see in above image, First column in Yellow marking are Manager Id’s stored in the DB radius. and second column marked in RED are passwords stored in encrypted format. Select & copy the encrypted password. Now goto http://crackstation.net/ (or there are other websites too that can encode hash encrypted passwords) and paste your password here and click crack hashes. and you will see your password in plain text in result window.    :) ~

As showed in the image below . . .

cracstation

.

How-to view Radius Manager User account password without changing old one !

Login to your Linux box using root account and execute following commands.

mysql -h localhost -u root -s -pyour_password
use radius;
select * from radcheck order by UserName;

It will show you all users Ids’s along with passwords in clear text format.

If you want to view only specific data, use the following script.

First create script and assign it execute rights.

touch /etc/rmuserlist.sh
chmod+x /etc/rmuserlist.sh

Now edit rmuserlist.sh
nano /etc/rmuserlist.sh

and paste the following data


#!/bin/bash
# Script Source: http://wiki.mikrotik.com/wiki/Bash_scripts_for_Linux/Mysql/Freeradius/PPPoE
# Syed Jahanzaib / aacable@hotmail.com
# http://aacable.wordpress.com

LUSERNAME="$1"

if [ -z "$LUSERNAME" ]; then
NAME=unspecified
fi

case $NAME in
unspecified)
MYCMD="mysql -h localhost -u root -s -pYOURPASSWORD -t -e "
$MYCMD "use radius; select * from radcheck order by UserName;"
$MYCMD "use radius; select * from radreply order by UserName;"
;;
*)
MYCMD="mysql -h localhost -u root -s -pYOURPASSWORD -e "
$MYCMD "use radius; select * from radcheck order by UserName;" |grep $LUSERNAME
$MYCMD "use radius; select * from radreply order by UserName;" |grep $LUSERNAME
;;
esac

Source: http://wiki.mikrotik.com/wiki/Bash_scripts_for_Linux/Mysql/Freeradius/PPPoENote: Make sure to change the password in above script.Save & EXIT.Now to view user list, simply type

/etc/rmuserlist.sh

it will show you all user list.To view particular user password, simply type its name like

/etc/rmuserlist.sh testing
password-of-user

Regard’s
SYED JAHANZAIB


Filed under: General IT Related, Linux Related

Mikrotik Webproxy with PCC

$
0
0

I received few requests from friends on how to configure mikrotik web proxy with PCC on same box to save hardware resources and ease of management. Although I never recommend to use Mikrotik web proxy as it is designed for SOHO usage, and suitable for small networks. It have basic capability of simple objects and it have only few options to tune.
- Usually when you enable web proxy on pcc, it wont work. To make it work you have to mark web proxy connection in output chain, and exlude port 80 traffic from pre-routing PCC rules. Example is as below. (I assume you have dual wan pcc already configured and in running state)

.

Add Rules in Output Chain & exclue port 80 traffic from PCC prerouting chain

Add following rules (Output chain)

/ip firewall mangle
add action=mark-connection chain=output comment=”Marking Web Proxy Connection for WAN-1″ disabled=no dst-port=80 new-connection-mark=WAN1_conn passthrough=yes per-connection-classifier=\
    both-addresses-and-ports:2/0 protocol=tcp

add action=mark-connection chain=output comment=”Marking Web Proxy Connection for WAN-2″ disabled=no dst-port=80 new-connection-mark=WAN2_conn passthrough=yes per-connection-classifier=\
    both-addresses-and-ports:2/1 protocol=tcp

.

Now exclude port 80 from the PCC rules in pre-routing chain.

add action=mark-connection chain=prerouting comment=”Excluding Port 80 from PCC – WAN1″ disabled=no dst-address-type=!local dst-port=!80 in-interface=LAN new-connection-mark=WAN1_conn passthrough=yes \
    per-connection-classifier=both-addresses-and-ports:2/0 protocol=tcp
add action=mark-connection chain=prerouting comment=”Excluding Port 80 from PCC – WAN2″ disabled=no dst-address-type=!local dst-port=!80 in-interface=LAN new-connection-mark=WAN2_conn passthrough=yes \
    per-connection-classifier=both-addresses-and-ports:2/1 protocol=tcp

As showed in the image below . . .

pcc-rules

.

.

.

Enable Mikrotik Web Proxy

Now Enable Web proxy.

/ip proxy
set always-from-cache=no cache-administrator=webmaster cache-hit-dscp=4 cache-on-disk=yes enabled=yes max-cache-size=unlimited max-client-connections=600 max-fresh-time=3d \
    max-server-connections=600 parent-proxy=0.0.0.0 parent-proxy-port=0 port=8080 serialize-connections=no src-address=0.0.0.0

As showed in the image below . . .

proxy

.

.

Redirect port 80 traffic to web proxy (Transparent Proxy)

Now redirect users port 80 traffic to web proxy by creating a NAT rule so all users browsing (port 80) request should automatically be redirected to mikrotik web proxy, (aka Transparent Proxy) (Move this rule at end in NAT section)

/ip firewall nat
add action=redirect chain=dstnat comment=”Redirect port 80 request to Web Proxy” disabled=no dst-port=80 protocol=tcp to-ports=8080

As showed in the image below . . .

80 redirect

.

.

.

Now try to browse from client side, or download using IDM etc, and see the both WAN usage and web proxy status.

WAN USAGE STATUS >

lb-show

.

.

WEB PROXY USAGE STATUS >

proxy-status

.

.

.

Mikrotik EXPORT  with complete script for Dual WAN and Proxy.

[admin@MikroTik-2] > /ip ad ex
# may/16/2013 09:09:34 by RouterOS 5.20
# software id = zaib-home

/ip address
add address=10.0.0.1/8 disabled=no interface=WAN1 network=10.0.0.0
add address=192.168.0.1/24 disabled=no interface=WAN2 network=192.168.0.0
add address=192.168.5.1/24 disabled=no interface=LAN network=192.168.5.0

/ip dns
set allow-remote-requests=yes cache-max-ttl=1w cache-size=5000KiB max-udp-packet-size=512 servers=8.8.8.8

/ip proxy
set always-from-cache=no cache-administrator=webmaster cache-hit-dscp=4 cache-on-disk=yes enabled=yes max-cache-size=unlimited max-client-connections=600 max-fresh-time=3d \
max-server-connections=600 parent-proxy=0.0.0.0 parent-proxy-port=0 port=8080 serialize-connections=no src-address=0.0.0.0

/ip firewall mangle
add action=mark-connection chain=input disabled=no in-interface=WAN1 new-connection-mark=WAN1_conn passthrough=yes
add action=mark-connection chain=input disabled=no in-interface=WAN2 new-connection-mark=WAN2_conn passthrough=yes

add action=mark-connection chain=output comment="Marking Web Proxy Connection for WAN-1" disabled=no dst-port=80 new-connection-mark=WAN1_conn passthrough=yes per-connection-classifier=\
both-addresses-and-ports:2/0 protocol=tcp
add action=mark-connection chain=output comment="Marking Web Proxy Connection for WAN-2" disabled=no dst-port=80 new-connection-mark=WAN2_conn passthrough=yes per-connection-classifier=\
both-addresses-and-ports:2/1 protocol=tcp

add action=mark-connection chain=prerouting comment="Excluding Port 80 from PCC - WAN1" disabled=no dst-address-type=!local dst-port=!80 in-interface=LAN new-connection-mark=WAN1_conn passthrough=yes \
per-connection-classifier=both-addresses-and-ports:2/0 protocol=tcp
add action=mark-connection chain=prerouting comment="Excluding Port 80 from PCC - WAN2" disabled=no dst-address-type=!local dst-port=!80 in-interface=LAN new-connection-mark=WAN2_conn passthrough=yes \
per-connection-classifier=both-addresses-and-ports:2/1 protocol=tcp

add action=mark-routing chain=prerouting connection-mark=WAN1_conn disabled=no in-interface=LAN new-routing-mark=to_WAN1 passthrough=yes
add action=mark-routing chain=prerouting connection-mark=WAN2_conn disabled=no in-interface=LAN new-routing-mark=to_WAN2 passthrough=yes

add action=mark-routing chain=output connection-mark=WAN1_conn disabled=no new-routing-mark=to_WAN1 passthrough=yes
add action=mark-routing chain=output connection-mark=WAN2_conn disabled=no new-routing-mark=to_WAN2 passthrough=yes

add action=accept chain=prerouting disabled=no dst-address=10.0.0.0/8 in-interface=LAN
add action=accept chain=prerouting disabled=no dst-address=192.168.0.0/24 in-interface=LAN

/ip firewall nat
add action=masquerade chain=srcnat comment="Masquerade WAN1 Traffic" disabled=no out-interface=WAN1
add action=masquerade chain=srcnat comment="Masquerade WAN2 Traffic" disabled=no out-interface=WAN2
add action=redirect chain=dstnat comment="Redirect port 80 request to Mikrotik Web Proxy" disabled=no dst-port=80 protocol=tcp to-ports=8080

/ip route
add check-gateway=ping disabled=no distance=2 dst-address=0.0.0.0/0 gateway=10.0.0.1 routing-mark=to_WAN1 scope=30 target-scope=10
add check-gateway=ping disabled=no distance=1 dst-address=0.0.0.0/0 gateway=192.168.0.1 routing-mark=to_WAN2 scope=30 target-scope=10

add check-gateway=ping disabled=no distance=1 dst-address=0.0.0.0/0 gateway=192.168.0.1 scope=30 target-scope=10
add check-gateway=ping disabled=no distance=2 dst-address=0.0.0.0/0 gateway=10.0.0.1 scope=30 target-scope=10

[admin@MikroTik-2] >

Regard’s
SYED JAHANZAIB


Filed under: Mikrotik Related
Viewing all 410 articles
Browse latest View live


Latest Images